
0
Owner's of the Agilent Technologies Power Supply Agilent Technologies Power Supply gave it a score of 0 out of 5. Here's how the scores stacked up:


A-11
ADJUSTMENT AND CALIBRATION
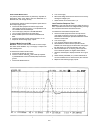
Current Limit Adjustment
+6V Supply. To adjust the current limit circuit in the +6V sup-
ply, proceed as follows:
a. Check the setting of the current limit by performing steps
(p) and (q) on page A-5. (Be sure to set the output voltage
to 6 volts.) If reducing the load resistance permits the cur-
rent to exceed 2.9 A, stop, turn R6 slightly clockwise, and
repeat the test. If, instead, the current begins to fall before
it reaches 2.6 A, turn R6 slightly counter clockwise and
repeat the test.
b. Recheck the setting and readjust R6 until the test shows
that the current limit circuit begins to reduce the current
when a decreasing load resistance increases it to 2.75 A
± 5%.
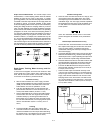
Meter Calibration
Panel Voltmeters. To calibrate voltmeter, proceed as follows:
a. Connect DVM across +20V output terminal and COM ter-
minal of the supply.
b. Turn on the supply.
c. Set the output voltage below 18V (ex, 15V), and adjust
R11 on the display board until front panel VOLTS display
reads exactly DVM value. Next, set the output voltage
above 20V (ex, 21V) and adjust R17 on the display board
until front panel VOLTS display reads exactly DVM value.
No other voltage output needs to be calibrated after
calibrating the voltmeter of +20V output.
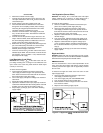
Panel Ammeter. To calibrate ammeter for +20V output and -
20V output, proceed as follows:
a. Connect R
S
between +20V output terminal and COM ter-
minal and connect DVM across R
S
.
b. Push +20V meter switch and turn ±20V VOLTAGE control
fully clockwise.
c. Turn on the supply and adjust R5 on the display board
until front panel AMPS display reads exactly DVM value
divided by Rs.
d. To calibrate the ammeter for +6V output, select +6V
meter switch and turn +6V VOLTAGE control fully clock-
wise.
e. Adjust R61 on the main board until front panel AMPS dis-
play reads exactly DVM value divided by Rs.


Find Your Products By Category
- Household Appliance
- Power Tools
- Computer Equipment
- Automotive
- TV and Video
- Outdoor Cooking
- Marine Equipment
- Kitchen Appliance
- Fitness & Sports
- Lawn and Garden
- Baby
- Laundry Appliance
- Personal Care
- Home Audio
- Photography
- Video Game
- Portable Media
- Musical Instruments & Equipment
- Communications
- Car Audio and Video
Please Login
