
0
Owner's of the Agilent Technologies Welding System Agilent Technologies Welding System gave it a score of 0 out of 5. Here's how the scores stacked up:


Chapter 3 Calibration Procedures
General Calibration/Adjustment Procedure
67
3
To calibrate the output voltages and currents of the power supply from the
front panel, proceed as follows:
1
Unsecure the power supply.
To calibrate the output voltage and current, you must unsecure the power
supply according to the procedure given on page 62.
2
Disconnect all loads from the power supply and connect a DVM across
output terminals of the +6V output.
3
Turn on the calibration mode.
Turn on the calibration mode by pressing the "Calibrate" key while
simultaneously turning on the power supply then continue to hold the
"Calibrate" key for about 5 seconds until a beep is heard.
Make sure that the power supply is in "CV" mode. If the power supply is not in
"CV" mode, an error occurs.
4
Move down a level to the voltage calibration mode for the +6V supply.
The display shows the above message to indicate that the power supply is ready
for the voltage calibration of +6V supply.
5
Select the first voltage calibration point for the +6V supply.
The display shows the first voltage calibration point for the +6V supply.
6
Read the DVM and change the first voltage value on the display to match
the measured voltage.
For example, if the DVM reading is 0.0860 V, adjust the voltage to 0.0860 V using
the knob and resolution selection keys.
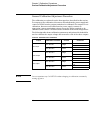
cal mode
cal setup 1
v lo +0.1
11
1000 v
v lo +0.0860 v
Calibrate
Power
Calibrate
Calibrate


Find Your Products By Category
- Household Appliance
- Power Tools
- Computer Equipment
- Automotive
- TV and Video
- Outdoor Cooking
- Marine Equipment
- Kitchen Appliance
- Fitness & Sports
- Lawn and Garden
- Baby
- Laundry Appliance
- Personal Care
- Home Audio
- Photography
- Video Game
- Portable Media
- Musical Instruments & Equipment
- Communications
- Car Audio and Video
Please Login
