
0
Owner's of the Brady Label Maker Brady Label Printer gave it a score of 0 out of 5. Here's how the scores stacked up:


6-4 Creating Custom Labels
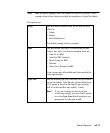
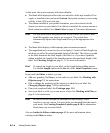
At this point, the system operates with these defaults:
z The blank label displayed reflects the size and color of the tape installed. If no
supply is installed when you launch Custom, the system assumes you are using
a white, 4-inch (102 mm) wide tape.
z The ribbon installed in your printer determines your color choices for the
objects you insert on your labels. If no ribbon is installed, the system assumes a
black continuous ribbon.
See About Color on page 8-2 for more information.
Hint! For best print results and greatest ease-of-use, before you create a label,
install the supplies you want to use to print it. The system then
automatically adjusts label length and offers you the appropriate color
choices.
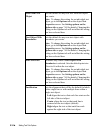
z The blank label displays with landscape print orientation assumed.
z The magnification (or zoom level) is set to display 12 inches of label length, but
this does not reflect the actual printable length of the label. The objects you add
to the label determine the final length of the label, or, if you have a paneled
ribbon installed, the length of the panel determines the maximum length of the
label.
See Checking Length on page 11-12 for more information.
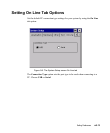
Hint! To control the length of your label, set the length before adding objects.
Use the Set Length option on the Size tab of the Label Properties screen.
From inside the Editor window, you can:
z Add text, graphics, HotShapes, or bar codes to your label. See Working with
Objectsn page 7-1 for instructions.
z Edit or change the properties of the objects you added to your label. See
Changing Objectsn page 7-31 for instructions.
z Print your completed label. See Printingn page 11-1.
z Save your label as a file so you can access it later. See Working with Files on
page 9-1 for instructions.
Hint! Be sure to browse through the standardized label designs, called
templates, on your system. You may find a pre-designed label that meets
your needs. See
Creating Template Labelsn page 6-10 for information
about these easy-to-create labels.
Also see Inside the Editor windown page 4-3 for more information about
working in the Editor window.


Find Your Products By Category
- Household Appliance
- Power Tools
- Computer Equipment
- Automotive
- TV and Video
- Outdoor Cooking
- Marine Equipment
- Kitchen Appliance
- Fitness & Sports
- Lawn and Garden
- Baby
- Laundry Appliance
- Personal Care
- Home Audio
- Photography
- Video Game
- Portable Media
- Musical Instruments & Equipment
- Communications
- Car Audio and Video
Please Login
