
0
Owner's of the Brady Label Maker Brady Label Printer gave it a score of 0 out of 5. Here's how the scores stacked up:


6-22 Creating Sets of Labels
Adding labels to a label set
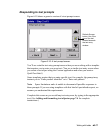
You create labels individually when you are making a set, but after the initial label,
you use the Add Label function to create the next label. The system then assumes
you are making a set of labels and adjusts the process accordingly, with some
differences for custom-created labels and those you create using pre-designed
templates.
Adding custom labels
To create a set of custom labels
1. Create the first label in the set.
2. When it is complete and displayed in the Editor window, press <Add Label>.
You do not have to close the initial label first or do anything to save it. The
system automatically stores it in a temporary location.
Note: The label is saved only temporarily. If you don’t save it as a file at the end
of the editing session, it will be discarded when you close the Editor window.
You’ll see a new blank label in the Editor window, and the status bar displays
the message:
Label 2 of 2.
3. Repeat the process for as many labels as you need in the set.
4. When the set is complete, choose Print. See Printing labels in a label setn
page 11-6 for further instructions.
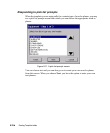
Adding template labels
To create a set of standardized template labels
1. Create the first label in the set.
2. When it is complete and displayed in the Editor window, press <Add Label>.
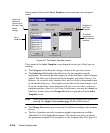
3. You’ll see the Template Categories screen, where you can begin the process
again by selecting a template again. Select the same template or a different on.
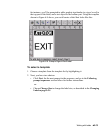
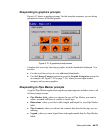
4. From this point, you’ll be prompted for the same kind of information the system
prompted you for with the original label. The status bar displays the message:
Label 2 of 2.


Find Your Products By Category
- Household Appliance
- Power Tools
- Computer Equipment
- Automotive
- TV and Video
- Outdoor Cooking
- Marine Equipment
- Kitchen Appliance
- Fitness & Sports
- Lawn and Garden
- Baby
- Laundry Appliance
- Personal Care
- Home Audio
- Photography
- Video Game
- Portable Media
- Musical Instruments & Equipment
- Communications
- Car Audio and Video
Please Login
