
0
Owner's of the Brady Label Maker Brady Label Printer gave it a score of 0 out of 5. Here's how the scores stacked up:


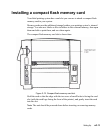


2-8 Installing supplies
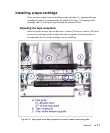
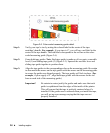
Figure 2-6. Color-coded measuring guide detail.
Step 1: Verify your tape’s size by noting the colored label in the center of the tape
cartridge’s handle. For example, if your tape is 4”, you will see a red label in the
center of the tape handle. That red label corresponds to the red bar on the color-
coded measuring guide (
Figure 2-6).
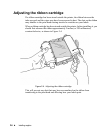
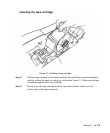
Step 2: Grasp both tape guides. Note: Each tape guide is made up of two parts: a movable
lever (1) and sliding tape guide (2) (
Figure 2-5). Squeeze the movable lever and
sliding tape guide together to position them.
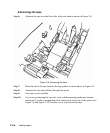
Step 3: Align the tape guides to the corresponding color on the measuring guide. Be certain
to also match the arrows on the tape guides with the arrows on the measuring guide
to ensure the guides are aligned properly. The tape guides will lock in place. (For
example, if your supply is 4”, align both tape guides with the arrows on the red
bars on each side of the measuring guide.)
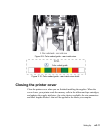
Important! Be certain to center justify the guides and make sure that each
guide is equidistant from the edges of the inside of the printer.
This will ensure that the tape is perfectly centered when it’s
installed. If the guides aren’t centered when you install the tape,
you will get an error message saying that the tape was not
properly installed.


Find Your Products By Category
- Household Appliance
- Power Tools
- Computer Equipment
- Automotive
- TV and Video
- Outdoor Cooking
- Marine Equipment
- Kitchen Appliance
- Fitness & Sports
- Lawn and Garden
- Baby
- Laundry Appliance
- Personal Care
- Home Audio
- Photography
- Video Game
- Portable Media
- Musical Instruments & Equipment
- Communications
- Car Audio and Video
Please Login
