
0
Owner's of the JVC Security Camera JVC Security Camera gave it a score of 0 out of 5. Here's how the scores stacked up:


99
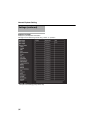
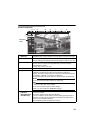
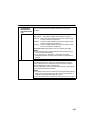
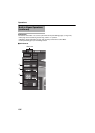
Screen Configuration
B
C
AEDHI
J
KL
F
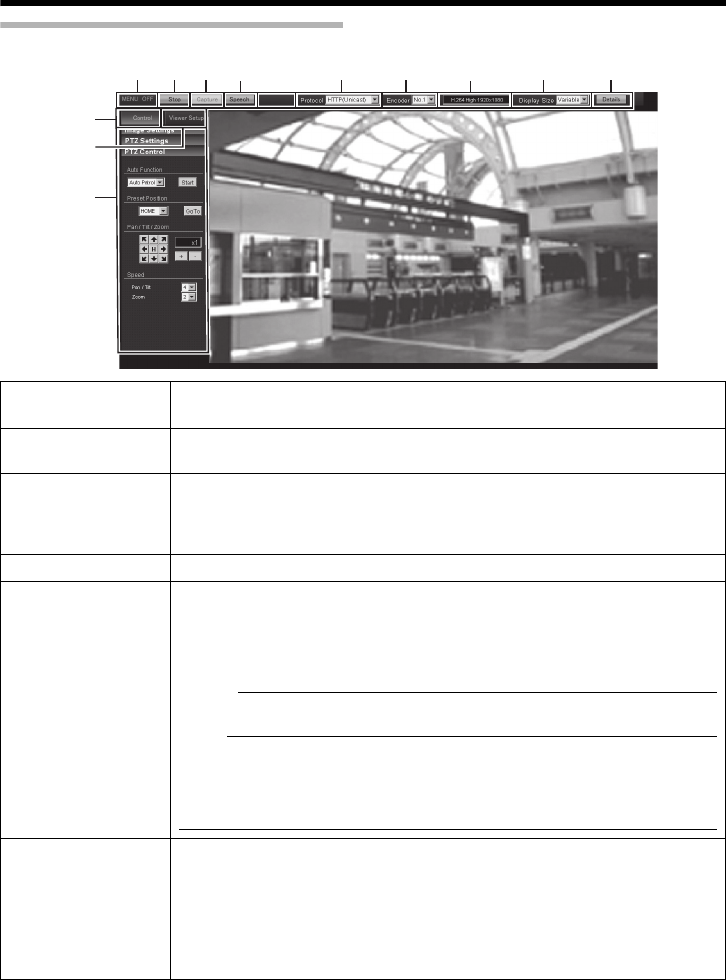
Operation
menu
A MENU OFF/
MENU ON
Displays or hides the operation menu.
Click [MENU ON], and the operation menu will appear at the left of the page.
B Control
Switches the Operation Menu to the Control Menu. Click the [Control] button to adjust
the [Image Settings], [PTZ Settings] or [PTZ Control] settings. (
A
Page 101, 104, 106)
C Viewer Setup Switches the Operation Menu to the Viewer Setup Menu.
Click this when you specify [Unicast], [Multicast], [On Screen Display],
[Audio Monitor] or [Other].
(A Page 108, 110, 112, 118, 120)
D Stop/Play Pauses or plays back images.
E Capture
Captures the currently displayed image in your computer. The image is recorded as
a JPEG file in the folder that is created under the [Document] folder of the
computer. This folder is named to have the
A
model name
B
during factory shipment.
(For example, AVN-H237B is named for the VN-H237.)
The file name shows the year, month, days, hours, minutes, seconds, and milliseconds.
Memo:
● You can rename the folder if desired. (A Page 120)
Note:
● The clock time of this file name is the clock time of the computer. Note
that it is not the AtimeB of the camera.
● You cannot capture images as motion images.
● Also, you cannot capture H.264/MPEG-4 images.
F Speech
(VN-H57U/
H257U/H257VPU/
H157WPU only)
When you click this, audio from the microphone connected to your computer
is sent to the camera.
The audio is output from the camera's LINE OUT.
If you do not click this, audio from the camera's audio signal input cable or
connector and audio from the microphone connected to the audio cable is
output from your computer speakers.
When transmitting audio, this button turns orange.


Find Your Products By Category
- Household Appliance
- Power Tools
- Computer Equipment
- Automotive
- TV and Video
- Outdoor Cooking
- Marine Equipment
- Kitchen Appliance
- Fitness & Sports
- Lawn and Garden
- Baby
- Laundry Appliance
- Personal Care
- Home Audio
- Photography
- Video Game
- Portable Media
- Musical Instruments & Equipment
- Communications
- Car Audio and Video
Please Login
