
0
Owner's of the JVC Security Camera JVC Security Camera gave it a score of 0 out of 5. Here's how the scores stacked up:


14
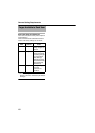
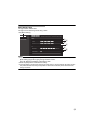
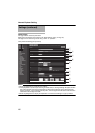
Internet Explorer Setting
Basic Setting1 Page (continued)
Settings (continued)
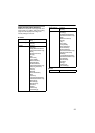
Network
A IP Setting Sets the DHCP client function.
To enable the DHCP, connect the camera to the network environment where
the DHCP server is running.
If you have set IP Setting to DHCP but the DHCP server does not exist, the
camera will start with the IP address of 192.168.0.2 and the subnet mask of
255.255.255.0 approximately 2 minutes after startup.
[Set values: DHCP Disable, DHCP Enable]
B IP Address Sets the IP address of camera.
[Factory default: 192.168.0.2]
C Subnet
Mask
Sets the subnet mask of camera.
[Factory default: 255.255.255.0]
D Default
Gateway
Sets the default gateway of camera. Enter 0.0.0.0 if you do not want to set a
default gateway.
[Factory default: 0.0.0.0]
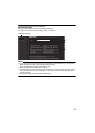
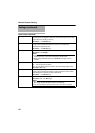
Time
E Time (read
only)
Displays the clock time of camera.
The time transmitted by camera is recorded in the JPEG header.
Memo:
● You cannot change the time with this item. For details about the time
settings, see the "Time" page. (A Page 70)
F Time Zone Sets a time zone.
[Set value: (GMT-12:00) - (GMT) UTC - (GMT+12:45)]
G PC Time to
Camera
Click the [Set] button to set the time of computer on the camera.
Memo:
● Your computer’s time zone cannot be applied. Only the time will be set.


Find Your Products By Category
- Household Appliance
- Power Tools
- Computer Equipment
- Automotive
- TV and Video
- Outdoor Cooking
- Marine Equipment
- Kitchen Appliance
- Fitness & Sports
- Lawn and Garden
- Baby
- Laundry Appliance
- Personal Care
- Home Audio
- Photography
- Video Game
- Portable Media
- Musical Instruments & Equipment
- Communications
- Car Audio and Video
Please Login
