
0
Owner's of the Brother Printer TD4100N gave it a score of 0 out of 5. Here's how the scores stacked up:

25
STEP
1
STEP
2
STEP
3
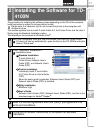
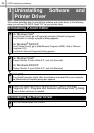
Getting started
Reference Installing the software
Introduction
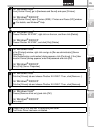
2
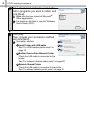
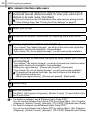
For Windows Vista
®
From [Control Panel], go to [Hardware and Sound] and open [Printers].
For Windows
®
2000/XP
From [Control Panel], open [Printers (2000) / Printers and Faxes (XP)] window.
For details, see Windows
®
Help.
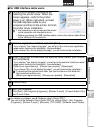
3
For Windows Vista
®
Choose "Brother XX-XXXX", right click on the icon, and then click [Delete].
For Windows
®
2000/XP
Choose "Brother XX-XXXX", and click [File]-[Delete].
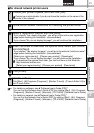
4
For Windows Vista
®
In the [Printers] window, right click and go to [Run as administrator]-[Server
Properties...].
If the [Authorization confirmation] dialog appears, click [Continue]. If the [User
Account Control] dialog appears, enter the password and click [OK].
For Windows
®
2000/XP
Go to [File]-[Server Properties].
5
For Windows Vista
®
Click the [Drivers] tab and choose "Brother XX-XXXX". Then, click [Remove...].
For Windows
®
2000/XP
Click the [Drivers] tab and choose "Brother XX-XXXX". Then, click [Remove].
6
For Windows Vista
®
Choose [Remove driver only] and click [OK].
For Windows
®
2000/XP
Go to step 7.
7
Close the [Print Server Properties] window.
The Printer Driver has been uninstalled.


Find Your Products By Category
- Household Appliance
- Power Tools
- Computer Equipment
- Automotive
- TV and Video
- Outdoor Cooking
- Marine Equipment
- Kitchen Appliance
- Fitness & Sports
- Lawn and Garden
- Baby
- Laundry Appliance
- Personal Care
- Home Audio
- Photography
- Video Game
- Portable Media
- Musical Instruments & Equipment
- Communications
- Car Audio and Video
Please Login
