
0
Owner's of the Briggs & Stratton Automobile Parts Briggs & Stratton Engine gave it a score of 0 out of 5. Here's how the scores stacked up:


10
BRIGGSandSTRATTON.COM
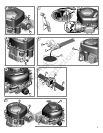
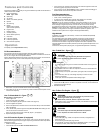
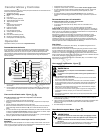
Add Oil
Place engine level.
Clean the oil fill area of any debris.
See the Specifications section for oil capacity.
1. Remove the dipstick (D) and wipe witha clean cloth (Figure 7).
2. Pour the oil slowly into the engine oil fill (E). Do not overfill. After adding oil, wait
one minute and then check the oil level.
Note: Do not add oil at the quick oil drain (I) (if equipped).
3. Install and tighten the dipstick.
4. Remove thedipstick andcheck the oillevel. Itshould beat the topof thefull indicator
(F) on the dipstick.
5. Install and tighten the dipstick.
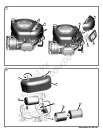
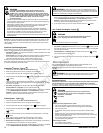
How To Service The Air Filter - Figure
13 14
WARNING
Fuel and its vapors are extremely flammable and explosive.
Fire or explosion can cause severe burns or death.
Never start or run the engine with the air cleaner assembly (if equipped) or the
air filter (if equipped) removed.
NOTICE: Do not use pressurized air or solvents to clean the filter. Pressurized air can
damage the filter and solvents will dissolve the filter.
The air filtersystem uses either aflat or acylindrical cartridge air filter. Some models are
also equipped with a pre-cleaner that can be washed and reused.
Flat Air Filter (Figure 13)
1. Pull up on the cover handle (A, Figure 13). Rotate the cover handle toward the
engine and then remove the cover (B).
2. Remove the pre-cleaner (C), if equipped, and the filter (D).
3. To loosen debris, gently tapt he filter on a hard surface. If the filter is excessively
dirty, replace with a new filter.
4. Wash the pre-cleaner in liquid detergent and water. Then allow it to thoroughly air
dry. Do not oil the pre-cleaner.
5. Assemble the dry pre-cleaner and the filter into the engine base (E).
6. Align the tabs (F) on the cover with the slots (G) in the blower housing. Rotate the
cover handle back and push down to lock in place.
Cylindrical Cartridge Air Filter (Figure 14)
1. Remove the fasteners (A) and the air filter cover (B). See Figure 14.
2. To remove thefilter (C), lift the end of the filter and then pull the filter off the intake
(D).
3. Remove the pre-cleaner (E), if equipped, from the filter.
4. To loosen debris, gently tapt he filter on a hard surface. If the filter is excessively
dirty, replace with a new filter.
5. Wash the pre-cleaner in liquid detergent and water. Then allow it to thoroughly air
dry. Do not oil the pre-cleaner.
6. Assemble the dry pre-cleaner to the filter.
7. Install the filter on theintake. Push the endof the filter into the baseas shown. Make
sure filter fits securely in the base.
8. Install air filter cover and secure with fasteners.
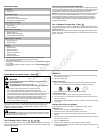
How To Replace The Fuel Filter - Figure
11
WARNING
Fuel and its vapors are extremely flammable and explosive.
Fire or explosion can cause severe burns or death.
Keepfuel awayfromsparks, openflames,pilot lights,heat,and otherignition
sources.
Check fuellines, tank, cap, andfittings frequently forcracks or leaks.
Replace ifnecessary.
Before cleaning or replacing the fuel filter, drain the fuel tank or close the fuel
shut-off valve.
Replacement parts must be the same and installed in the same position as the
original parts.
If fuel spills, wait until it evaporates before starting engine.
1. Before replacing the fuel filter (A, Figure 11), if equipped, drain the fuel tank or close
the fuel shut-off valve. Otherwise, fuel can leak out and cause afire or explosion.
2. Use pliers to squeeze tabs (B) on the clamps (C), then slide the clamps away from
the fuel filter. Twist and pull the fuel lines (D) off of the fuel filter.
3. Check the fuel lines for cracks or leaks. Replace if necessary.
4. Replace the fuel filter with an original equipment replacement filter.
5. Secure the fuel lines with the clamps as shown.
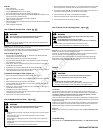
How To Clean The Air Cooling System - Figure
12
Running engines produce heat. Engine parts, especially muffler,
become extremely hot.
Severe thermal burns can occur on contact.
Combustible debris, such as leaves, grass, brush, etc. can catch fire.
WARNING
Allow muffler, engine cylinder and fins to cool before touching.
Remove accumulated debris from muff ler area and cylinder area.
NOTICE: Do not use water to clean the engine. Water could contaminate the fuel
system. Use a brush or dry cloth to clean the engine.
This is an air cooled engine. Dirt or debris can restrict air flow and cause the engine to
overheat, resulting in poor performance and reduced engine life.
Use a brush or dry cloth to remove debris fromthe finger guard /rotating screen (A).
Keep linkage, springs and controls (B) clean. Keep the area around and behind the
muffler (C) free of any combustible debris (Figure 12).
Storage
WARNING
Fuel and its vapors are extremely flammable and explosive.
Fire or explosion can cause severe burns or death.
When Storing Fuel Or Equipment With Fuel In Tank
Store away from furnaces, stoves, water heaters or other appliances that have
pilot lights or other ignition sources because they can ignite fuel vapors.
Fuel System
Fuel can become stale when stored over 30 days. Stale fuel causes acid and gum
deposits to form in the fuel system or onessential carburetor parts. To keep fuel fresh,
use Briggs & Stratton Advanced Formula Fuel Treatment & Stabilizer, available
wherever Briggs & Stratton genuine service parts are sold.
There is no need to drain gasoline from the engine if a fuel stabilizer is added according
to instructions.Run the enginefor 2 minutesto circulate thestabilizer throughout the fuel
system before storage.
If gasolinein the enginehas not beentreated witha fuel stabilizer, itmust bedrained into
an approved container. Run the engine until it stops from lack of fuel. The use of a fuel
stabilizer in the storage container is recommended to maintain freshness.
Engine Oil
While the engine is still warm, change the engine oil. See the How To Change The Oil
section.
Troubleshooting
Need Assistance? Go to BRIGGSandSTRATTON.COM or call 1-800-233-3723 in USA.
Not for
Reproduction


Find Your Products By Category
- Household Appliance
- Power Tools
- Computer Equipment
- Automotive
- TV and Video
- Outdoor Cooking
- Marine Equipment
- Kitchen Appliance
- Fitness & Sports
- Lawn and Garden
- Baby
- Laundry Appliance
- Personal Care
- Home Audio
- Photography
- Video Game
- Portable Media
- Musical Instruments & Equipment
- Communications
- Car Audio and Video
Please Login
