
4.0
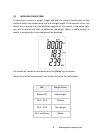
Owner's of the Adam Equipment Treadmill Adam Equipment Treadmill gave it a score of 4.0 out of 5. Here's how the scores stacked up:
3
© Adam Equipment Company 2012
1.0 INTRODUCTION
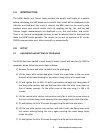
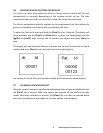
The MUW Health and Fitness scale provides the weight and height of a patient
before calculating the BMI based on the results. Each result will be displayed on the
Indicator and held until the result is cleared, the BMI result can be used to help
evaluate some ones overall health. Units of weighing are Kg, Lbs, and Lbs and
Ounces. Height measurements are displayed in cm, feet and inches, and inches.
There is an internal rechargeable battery as well as wheels fitted to the base that
make the MUW totally portable. The results can be sent to a printer or PC via the
RS232 communication port, either manually or automatically.
2.0 SET
UP
2.1 UNPACKING
AND
SETTING
UP
YOUR
MUW
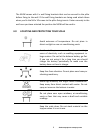
The MUW has been packed in such a way to make it quick and easy for the USER to
assemble, please follow the instructions as below.
1) Remove the base and pillar sections from the packaging.
2) Lift the lower pillar section and place it with the screw holes at the rear onto
the back of the base allowing for the cable to hang freely in the open area.
3) Fit and tighten the 4 x M5 x 15 bolts and washers through the fixing plate of
the lower pillar section and into the base then slide the pillar cover down so
that it locates securely. Fix the pillar cover at the rear using 2 x M4 x 10
screws.
4) Lift the central pillar section into position and slide it with the screw holes at
the rear onto the fixing insert ensuring the cable hangs freely inside the pillar.
5) Fit and tighten 4 x M4 x 10 screws through the pillar and into the insert.
6) Lift the top pillar section into position and slide it onto the fixing insert with
the sensor housing facing the front, again ensuring the cable hangs freely
inside the pillar.
7) Fit and tighten 4 x M4 x 10 screws through the pillar and into the insert.


Find Your Products By Category
- Household Appliance
- Power Tools
- Computer Equipment
- Automotive
- TV and Video
- Outdoor Cooking
- Marine Equipment
- Kitchen Appliance
- Fitness & Sports
- Lawn and Garden
- Baby
- Laundry Appliance
- Personal Care
- Home Audio
- Photography
- Video Game
- Portable Media
- Musical Instruments & Equipment
- Communications
- Car Audio and Video
Please Login
