

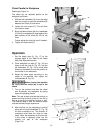
0
Owner's of the Powermatic Digital Photo Frame Tilting Table Hollow Chisel Mortiser gave it a score of 0 out of 5. Here's how the scores stacked up:


9
3. Grounded, cord- connected tools intended for use on a supply circuit having a nominal rating between
150 - 250 volts, inclusive.
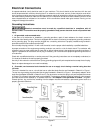
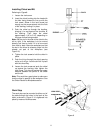
This tool is intended for use on a circuit that has an outlet that looks like the one illustrated in Sketch D in Figure 1.
The tool has a grounding plug that looks like the plug illustrated in Sketch D in Figure 1. Make sure the tool is
connected to an outlet having the same configuration as the plug. No adapter is available or should be used with this
tool. If the tool must be reconnected for use on a different type of electric circuit, the reconnection should be made by
qualified service personnel; and after reconnection, the tool should comply with all local codes and ordinances.
4. Permanently connected tools:
This tool should be connected to a grounded metal permanent wiring system; or to a system having an equipment-
grounding conductor.
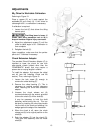
Converting from 115 to 230 Volt
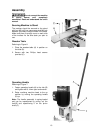
Remove the cover of the push button switch and consult the diagram inside the cover. This diagram is also shown in
Figures 3 and 4. (The diagram inside the cover takes precedence – always check it first ).
Disconnect the machine from the power source.
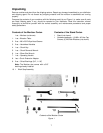
This mortiser is supplied with four leads that are connected for 115V operation, as shown in Figure 3. Reconnect
these four leads for 230V operation, as shown in Figure 4.
The 115V attachment plug (shown in A, Figure 2) must be replaced with a UL/CSA listed plug suitable for 230V
operation (shown in D, Figure 2). The mortiser must comply with all local and national codes after the 230 volt plug is
installed.
Important: In all cases (115 or 230 volts), make certain the receptacle in question is properly grounded. If
you are not sure, have a registered electrician check the receptacle.
Figure 3 Figure 4
Extension Cords
If an extension cord is necessary, make sure the cord rating is suitable for the amperage listed on the machine’s
motor plate. An undersize cord will cause a drop in line voltage resulting in loss of power and overheating. Use the
chart in Figure 5 as a general guide in choosing the correct size extension cord for the Bandsaw. If in doubt, use the
next heavier gauge. The smaller the gauge number, the heavier the cord.
Recommended Minimum Gauge (AWG) of Extension Cords
Ampere Rating
Volts Total Length of Cord in Feet
115 V 25 ft. 50 ft. 100 ft. 150 ft.
230 V 50 ft. 100 ft. 200 ft. 300 ft.
A
WG
< 6 18 16 16 14
6 to 10 18 16 14 12
10 to 12 16 16 14 12
12 to 16 14 12
Not recommended Not recommended
Figure 5


Find Your Products By Category
- Household Appliance
- Power Tools
- Computer Equipment
- Automotive
- TV and Video
- Outdoor Cooking
- Marine Equipment
- Kitchen Appliance
- Fitness & Sports
- Lawn and Garden
- Baby
- Laundry Appliance
- Personal Care
- Home Audio
- Photography
- Video Game
- Portable Media
- Musical Instruments & Equipment
- Communications
- Car Audio and Video
Please Login
