

0
Owner's of the Bushnell Digital Camera Bushnell Digital Camera gave it a score of 0 out of 5. Here's how the scores stacked up:


7
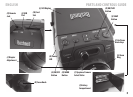
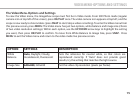
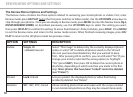
TAKING STILL PHOTOS
you plug the supplied remote shutter cable into the “Remote” jack (K) to obtain sharper results, free
of vibration. Press the button on the remote to take a photo. The display will black out briey, before
showing the captured image for a second or two. The “blackout” is normal as the image is being stored
on the SD card, especially with high resolution images that generate large les. When the display icons
reappear, you’re ready to shoot again.
5. The “remaining photos” counter at the top of the screen will drop by one number after each photo (or
two, depending on your subject and settings) is taken. When the display indicates “Disk full” when SNAP
is pressed, you are out of card memory (le storage space), and will need to download the photos you
have taken so they can be deleted to make room in the memory for new photos, or you may remove the
SD card and install a new card if you are on a trip away from your computer.
6. For additional magnication while taking photos, digital zoom is available. Press the UP arrow key to
zoom in. You will see the result on the live preview display screen, as the digital zoom indicator increases
(in 0.2x increments up to 4.0x). Press the DOWN arrow key to zoom back out. To turn o all digital zoom
(22x optical magnication only), keep pressing or hold the DOWN key until the zoom indicator goes
back down all the way to “1.0x”.
7. To review a photo after you take it, press the OK/PLAY button twice to enter Review mode. To see
previous photos, press the UP arrow key-each press takes you back one photo, and pressing the DOWN
arrow key moves forward towards more recent photos. Press the OK/PLAY button again to return to
the Still Photo mode (live preview). See the section “Review Menu-Options and Settings” for details on
deleting photos and protecting important photos.
NOTE: Use care during handling to avoid touching the exposed lenses of the ImageView spotting scope to prevent degrading the image
quality. Clean the lenses only with camera lens cleaning tissue or microber cloth, after removing loose dust or dirt with a blower brush
or “canned air”. Camera lens cleaning uid may be used if necessary (lightly moisten the lens tissue, do not apply directly to the lens),
avoid the use of other liquids of any type.


Find Your Products By Category
- Household Appliance
- Power Tools
- Computer Equipment
- Automotive
- TV and Video
- Outdoor Cooking
- Marine Equipment
- Kitchen Appliance
- Fitness & Sports
- Lawn and Garden
- Baby
- Laundry Appliance
- Personal Care
- Home Audio
- Photography
- Video Game
- Portable Media
- Musical Instruments & Equipment
- Communications
- Car Audio and Video
Please Login
