
0
Owner's of the Adam Equipment Postal Equipment Adam Equipment Postal Equipment gave it a score of 0 out of 5. Here's how the scores stacked up:


© Adam Equipment Company 2005 7
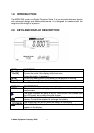
4. The indicator will show the selection capacity: “
P1000
” “
P2000
”….”
P5000
”,
Select “
P2500
” for 250kg, then press the [On/Off] key once.
5. Indicator will automatically show the decimal points: “
POT 0
” “
PT0.0
” “
T0.00
”
“
T0.000
”, “
POT 0
”. Select the “
PT0.0
” and press the [On/Off] key again.
6. Indicator will display “
ULOAD
”. Press the [On/Off] key again.
7. Indicator will show the internal value. After it is stable, it will show “
LOAd
”.
8. Put the mass (suggest the full capacity) and press the [On/Off] key, the
indicator shows the internal value (after loading) and the will show “
Ld-In
” after
stable.
9. Press the [On/Off] key. Then press the [Hold] key. The last digit of the
display will be moving from “
0-9
”. Press the [Hold] key, the digit will move
forward to one position. When the figure displayed is same as the capacity of
the standard weight, press the [On/Off] key.
For example: If a 10 kg weight is used instead of full capacity:
After you process till the step (9) as above, press the [On/Off] key.
The indicator will show: “
0.0
”. Press the [Hold] key, the last digit will be
automatically jumped from “
0
” to”
9
”. When the figure jumps to “
1
”, press the
[Hold] key three times. Now, the “
1
” will be moved to the 3
rd
forward position
and the display will be changed to “
10.0
”. At this time you are required to
press the [On/Off] key immediately.
Next the display will show the current weight on the pan.
10. The Calibration is now complete.
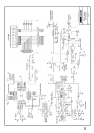
11. Set the span jumper on the PCB to OFF position and re-seal the indicator.
12. If the selections made during calibration are not as described as above, the
scale may still work but will not show accurate results. In such cases, re-do
the calibration as shown above.


Find Your Products By Category
- Household Appliance
- Power Tools
- Computer Equipment
- Automotive
- TV and Video
- Outdoor Cooking
- Marine Equipment
- Kitchen Appliance
- Fitness & Sports
- Lawn and Garden
- Baby
- Laundry Appliance
- Personal Care
- Home Audio
- Photography
- Video Game
- Portable Media
- Musical Instruments & Equipment
- Communications
- Car Audio and Video
Please Login
