

0
Owner's of the RobinAir Air Conditioner Robinar Air Conditioning Component Flusher gave it a score of 0 out of 5. Here's how the scores stacked up:
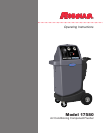
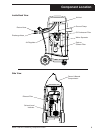


Model 17580 Air Conditioning Component Flusher
7
Solvent Replacement
To avoid excessive foaming and potential contaminant carry-over, it
is recommended the solvent be changed after each job. It is strongly
recommended that the used solvent be removed from the machine immediately
after a FLUSH/PURGE cycle.
1. Place the end of the discharge hose in a suitable waste container.
2. Verify the selection valve is OFF and shop air is connected.
3. Turn the selection valve to FLUSH.
4. Turn the selection valve to OFF when the solvent is evacuated from the
machine.
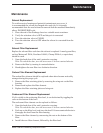
Solvent Filter Replacement
Replace the solvent lter each time the solvent is replaced. A non-bypass lter,
such as Motorcraft FL1A, Purolator L30001, Champ PH-8-A, or equivalent,
should be used.
1. Open the back door of the unit’s protective covering.
Note: To unlock the door, turn the two screws 1/4 turn counterclockwise.
2. Remove the lter by turning it counterclockwise.
3. Hand tighten the new lter in a clockwise direction.
Carbon Filter Element Replacement
The carbon lter element should be replaced when odors become noticeably
stronger during the purge cycle.
1. Remove the lter retaining plate by removing the wing nut on the lter
housing.
2. Remove and replace the lter element.
3. Replace the lter retaining plate and wing nut.
Coalescent Filter Element Replacement
If oil is visible in the coalescing lter bowl, it can be drained by toggling the
valve on the bottom of the bowl.
The coalescent lter element can be replaced as follows:
1. Open the back door of the unit’s protective covering.
Note: To unlock the door, turn the two screws 1/4 turn counterclockwise.
2. Push up on the lter bowl, and turn the bowl 1/8 turn counterclockwise to
disengage the bowl from the lter housing.
3. Remove the lter element by unscrewing the nut on the bottom of the
lter.
4. Install the new lter element, followed by the lter bowl.
Maintenance
Maintenance


Find Your Products By Category
- Household Appliance
- Power Tools
- Computer Equipment
- Automotive
- TV and Video
- Outdoor Cooking
- Marine Equipment
- Kitchen Appliance
- Fitness & Sports
- Lawn and Garden
- Baby
- Laundry Appliance
- Personal Care
- Home Audio
- Photography
- Video Game
- Portable Media
- Musical Instruments & Equipment
- Communications
- Car Audio and Video
Please Login
